Many car owners pour money into the loudest speakers and subwoofers in addition to a high-end amplifier. Unfortunately, the majority of them still fail to generate much of a boom. Why?
Their lack of knowledge regarding amplifier tuning is to blame. However, despite its apparent difficulty, tuning an amp is not hard at all.
To tune the amplifier in your car, you will need to adjust the volume, gain, and bass boost levels. It is also vital to make some changes to frequencies.
We will begin this article by introducing all the variables you may need to adjust during the tuning phase. Following that, we will provide detailed instructions on how to tune your amplifier quickly.
Let’s kick things off!
What You Need to Know Before Tuning Amps
There are a few terms associated with amp tuning that you may be unfamiliar with. We will elaborate on all of those concepts and terms below. It will give you an idea of the adjustments necessary in order to fine-tune your amp.
- Frequency
Frequency indicates how many times an electrical signal or sound wave repeats itself during a given period. Audio signals have frequencies ranging from 20 Hz to 20,000 Hz (20 kHz).
The greater the frequency, the louder the pitch will be.
For example, a low-frequency 20 Hz signal produces a deep bass tone, while one with a high frequency of 20 kHz emits an ear-piercing sound.
- Bass Boost
Some amplifiers have a bass boost feature that enhances the bass response of the sound.
Low-end frequencies in subwoofers are louder and more prominent as the bass levels increase. Hence, it is an effective way to enhance the clarity and punch of sound.
- Max/Peak Power
Max power describes the maximum amount of power an amplifier can deliver in a short time frame. It is the peak power in watts that amps generate when pushed to their limits.
While this number may seem impressive, keep in mind that it isn’t sustainable or continuous.
In other words, it only measures maximum power output and does not give a reliable output estimate under normal conditions.
- RMS Power
RMS (Root Mean Square) power refers to the average amount of power an amplifier can produce over a longer period of time. It is also expressed in watts and provides a more accurate measure of how much power an amp can handle on a daily basis.
Since RMS represents constant power output, you must consider this rating when choosing an amplifier.
- Low-pass and High-pass Filters
These filters tailor the frequency range of audio signals. A low-pass filter transmits lower frequencies, whereas high-pass filters suppress lower frequencies so higher frequencies can pass through.
For reducing bass in an audio signal, we suggest using low-pass filters. They are also ideal for minimizing low-frequency feedback on live sound systems and making sounds thinner on digital instruments.
On the other hand, high-pass filters are commonly used to enhance audio treble. You can use this to add clarity to vocals or guitar signals.
- Gain
Gain describes how much an amplifier can increase an input signal’s level. It is typically measured in decibels (dB). The bigger the number, the stronger the signal is.
The main advantage of gain is that when you adjust it correctly, you can drastically lessen the amount of distortion and background noise.
People often assume that an amplifier’s gain is the same as its output level. This is certainly not the case, as the output level is measured in watts and is an entirely different topic.
Quick Guide on How to Tune an Amplifier
Here it is, the most exciting part of the article you’ve been waiting for. We have outlined a step-by-step guide below explaining how to tune your amp.
STEP 1 – Turn off the Stereo and Then On Again
Start by shutting off your stereo and unplugging the amp’s RCA cables.
Some speakers are powered by the radio, meaning they have another subwoofer. If your car has a similar setup, make sure you don’t leave any of those speakers plugged in.
Switch on the stereo and raise the volume to the maximum. However, do not play any music or other media.
STEP 2 – Lower the Volume
You turned the volume all the way up in the previous step, which your car should indicate with a 100% sign. Now lower this level to 80%.
You must then change the Equalizer setting on your radio to Flat. What else you need to do is disable your amplifier’s gain and bass boost, as well as the crossover filters.
STEP 3 – Determine the Base Gain
Since many vehicles have more than one speaker, each with a unique set of RCA cables, pick the one you want to tune. Once you have decided what channel to tune, connect the RCAs to that one.
Set up a test disk and gradually bump up the gain. Do not stop raising the gain until distortion occurs.
Now you have to eliminate distortion, which means lowering the gain until distortion no longer exists.
This way, you should end up with a base gain to tune your frequency with.
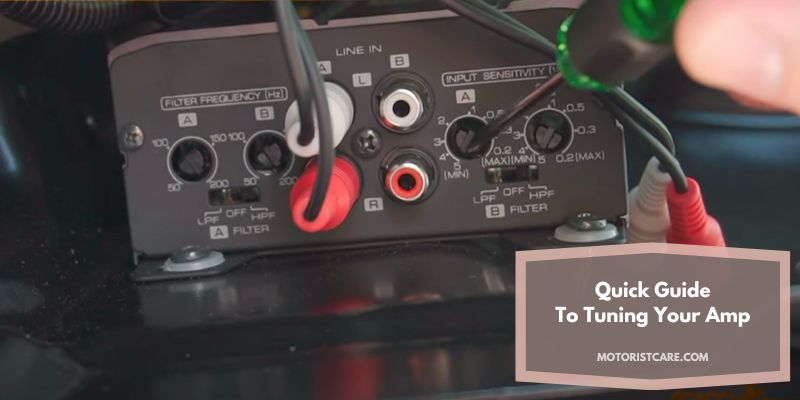
STEP 4 – Apply Crossovers and Filters
Before we proceed further, please note that you can skip this step if you only use amplifiers to drive small and mid-sized speakers. In such a case, simply choose a full or off position, and you’re good to go.
To continue with our step, let’s use the amplifier’s built-in crossovers and filters. The type of setup you have determines what filter you should apply.
- If you are using subwoofers, go with low-pass filtering (LPF).
- If you have separate subwoofers or speakers to handle low frequencies, opt for a high-pass filter (HPF).
STEP 5 – Identify the Frequency Range
It is time to find out what frequency range your speakers or subwoofers operate at. Let’s figure out how.
- Speakers
Those who use speakers will once again choose HPF. Afterward, set the frequency dial to the lowest level of your speaker’s support.
- Subwoofers
As you can probably guess, LPF is the filter of choice for subwoofer owners. Unlike speaker configuration, you must turn the frequency dial to the highest setting compatible with the subwoofer.
STEP 6 – Enable Bass Boost If Desired
The bass boost can make the sound louder by increasing the bass response. It is, however, extremely difficult to adjust. Most of the time, you are not going to set bass boost settings correctly, resulting in amp damage.
Nonetheless, if you are willing to take risks to experience true loudness, you can raise the bass boost. As you increase the bass boost level, decrease gain.
The key here is to strike the right balance between bass boost and gain for a distortion-free loud sound.
STEP 7 – Set the Gain
So, we have configured two complex parameters: frequency and bass boost. Now let’s tweak gains a little further.
Make sure you are listening to something with an 80% to 100% volume on the radio. Once the sound is clear, begin tuning the gain.
The goal here is to get rid of even the tiniest bit of distortion once and for all. As soon as you discover such an ideal gain, the job is done.
STEP 8 – Verify If There Is Any Distortion
The final step starts by reconnecting each amp. Those who individually tune channels or amplifiers must go through this process.
Next, lower your radio’s volume to zero and then increase it to 80%. If you detect distortion before reaching 80%, don’t raise the volume.
In that case, reduce the gain slightly to prevent distortion.
Nevertheless, turning the volume to 80% is unlikely to cause distortion if the tune is correct.
Tips on Tuning Amplifiers More Effectively
Here are three tips to help you improve the tuning of your amplifier.
1. Consider Your Setup
Examine your setup before tuning and make adjustments accordingly. Among them are:
- How your stereo functions.
- What type of amplifier you have
- How many speakers do you have, and what types
Quite often, amateurs mimic their peers’ tuning techniques only to be disappointed by the results. They fail to recognize that their equipment requires a unique tuning approach.
2. Trust Your Ears
There is a tendency for people to tune amps solely based on technical specifications.
While specs matter, it’s your ears that can actually tell whether or not a sound is pleasant. Therefore, when you modify the device, give it a listen first and then tweak it according to what you hear.
3. Don’t Go Overboard with Your Gains
One of the most challenging and important aspects of amp tuning is adjusting the gain appropriately. Thus, tinker with it carefully and avoid overdoing it.
Remember that more gains don’t necessarily translate into more volume.
Frequently Asked Questions
1. How do you know if your gain is too high?
If the amplifier’s gain is too high, distortion and clipping may occur, particularly at high volumes. You may also feel that the sound becomes too bright or trebly. If you are still in doubt, measure the gain levels of your amplifier using an oscilloscope.
2. Does higher RMS mean deeper bass?
No, higher RMS doesn’t always mean deeper bass. RMS is simply an evaluation of an audio signal’s average power.
A higher RMS value means a stronger audio signal, but this does not necessarily imply deeper bass.
Final Words
The article hopefully provided you with some insight into performing quick amplifier tuning. There are only a few things to change, such as the gain, frequency, and bass boost.
Moreover, you won’t need any special tools to carry out the procedure if you follow our guide.
Related guide: