
Many automobile amplifiers possess a function known as “bridging” or “bridge mode,” which allows combining two channels to generate a single channel with maximum power output.
Bridging your amplifier is essential to gain robust, clear audio that enhances listening enjoyment.
Engaging in this process with your audio equipment offers several benefits. The procedure itself is straightforward and uncomplicated. All that is required is the connection of a few wires, and voila!
In this article, we’ll guide you through how to bridge a 4 channel amp with the different steps involved.
Important Rules Of Bridging
Before starting the bridging process, there are a few essential considerations to bear in mind.
1. Confirm the Amplifier’s Bridging Capability
Refer to the instruction manual to determine if your amplifier supports bridging. Alternatively, you can check the amplifier’s specifications online for this information.
2. Ensure Compatibility With Half the Resistance Load
Check the user manual to verify that the amplifier can operate effectively when subjected to half the resistance load, which occurs when bridging.
If the amplifier cannot handle this configuration, it may overheat and encounter issues.
3. Check for Internal Bridging
Ensure the amplifier is not internally bridged; attempting to bridge it manually would be unnecessary and potentially problematic. Confirm this aspect beforehand.
4. Understand the Impact on Stereo Amplifiers
Bridging a stereo amplifier will convert it into a mono amp, combining the two channels into a single output.
5. Connect Positive and Negative Terminals
Connect the positive wires from the amplifier to the positive lead of the speaker, and do the same for the negative terminals.
6. Secure the Wires Carefully
Take care to secure the wires correctly. You may need to strip less than an inch of insulation from the wires coming out of the speaker to ensure a secure connection.
7. Meet Minimum Impedance Requirements
Each speaker must meet the minimum impedance requirements. Impedance helps to measure how much electricity is slowed down or blocked when it goes through something like a wire or a device. It’s like a speed bump for electricity.
If you plan to connect multiple speakers, ensure that the combined impedance of all speakers meets the minimum requirements.
8. Wiring for Dual-Voice Coil Speakers
If you intend to use them, you must wire them accordingly to meet the impedance requirements.
How to Bridge a 4 Channel Amp
In technical terms, bridging involves the precise connection of leads to the amplifier terminals. Although it doesn’t require many tools, certain conditions must be met beforehand.
What you’ll need:
- Bridgeable Amplifier
- Speaker/s
- Wire Stripper
Step 1:Verify Amplifier Compatibility With Bridging
Ensure that the amplifier you intend to use supports bridging. Some amplifiers are already internally bridged, while others may not support bridging at all.
When an amplifier is bridged, the resistance load is halved. The amplifier may overheat or sustain permanent damage if not designed to handle bridging.
Check the brochures or the amplifier itself for indications of bridging compatibility. You can also cross-reference the specifications online.
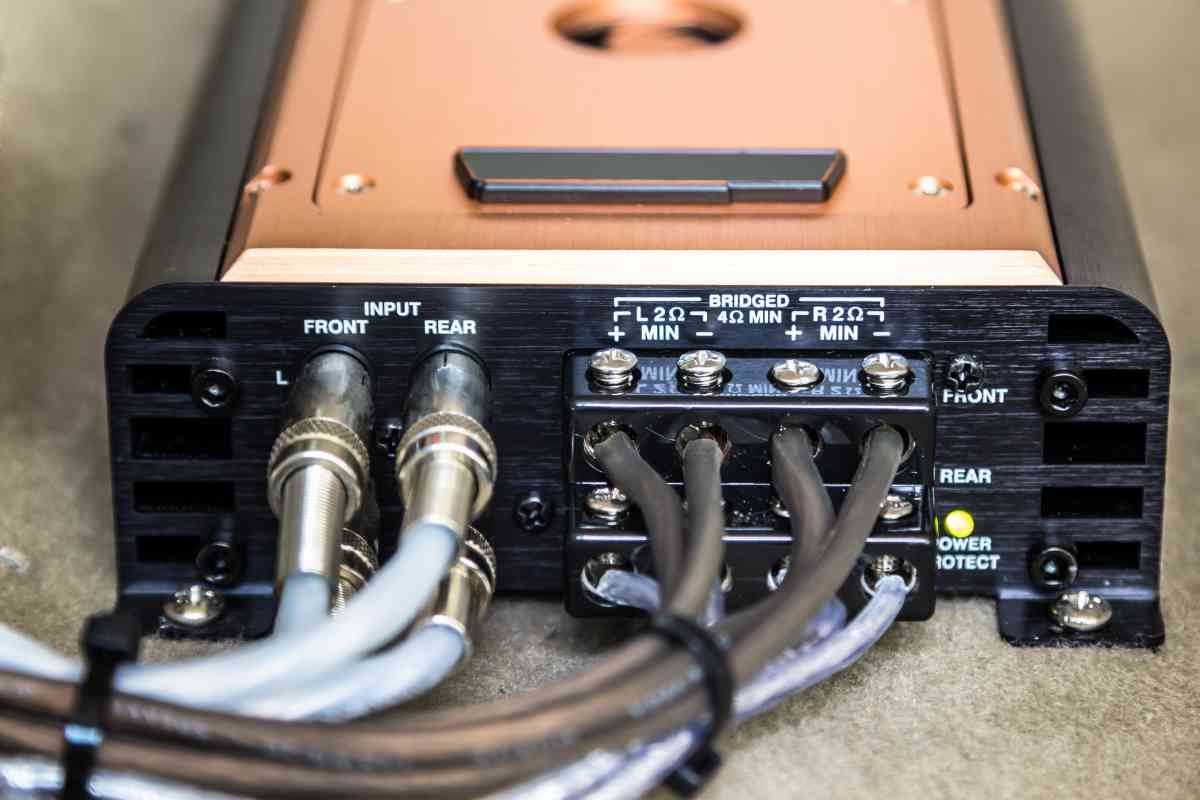
Step 2: Identify the Amplifier’s Terminals, Positives, and Negatives
You’ll find eight terminals on the back of a 4-channel amplifier, with 4 being positives and 4 being negatives.
Additionally, there are four channels, and each channel consists of a pair of positive-negative terminals.
You’re ready to bridge the amplifier once you are familiar with these components.
Step 3:Connect Two Speakers to the Four Channels
To bridge a speaker, connect the positive lead of the speaker to the positive terminal of channel one on the amplifier. Then, connect the negative lead of the speaker to the negative terminal of channel 2.
One speaker will utilize two channels to maximize their potential. This step follows a similar process if you’re bridging a 2-channel amplifier.
Repeat the same process with another speaker. Use the positive and negative terminals of channels 3 and 4.
By doing this, you’ll have connected two front and rear speakers to the 4-channel amplifier.
How To Bridge A 4 Channel Amp To 2 Subwoofers
Bridging a four-channel amp to two subwoofers is a straightforward process. Follow the steps outlined below:
Step 1: Wire Stripping
Using a wire stripper, remove about ½ inch of insulation from the wire.
Step 2: Positive Wire Connection
Insert the red wire into terminal one, connecting it to the positive terminal of the first channel.
Step 3: Negative Wire Connection
Insert the black wire into terminal four, connecting it to the negative terminal of the second channel. This completes the connection for the first subwoofer.
Step 4: Connect the Second Subwoofer
Repeat steps 1 and 2 to connect the second subwoofer. Use terminal five for the positive and eight for the negative wires, corresponding to the third and fourth channels.
Tighten the screws securely and double-check all connections. Ensure that the connection is stable without any loose wires.
How to Bridge a 4-Channel Amp to 2 Speakers and 1 Subwoofer
Connecting a 4-channel amp to two speakers and one subwoofer is straightforward. Follow the steps below to establish the desired connection:
Step 1: Speaker Wiring
Begin by wiring the two speakers to the front channels of the amplifier. Connect the positive leads of each speaker to the positive terminals of their respective front channels.
Similarly, connect the negative leads of each speaker to the negative terminals of their corresponding front channels.
Step 2: Subwoofer Wiring
Next, wire the subwoofer to the rear channels of the Amp by bridging the channels. Connect the subwoofer positive lead to the rear channel positive terminal to achieve this.
Then connect the subwoofer negative lead to the other rear channel negative terminal. You can always interchange the channels by connecting the speakers to the rear and the subwoofer to the front channels.
How to Bridge a 2-Channel Amp
Adding a subwoofer to a factory stereo system doesn’t require excessive power to maintain balanced bass with the rest of the music.
Suppose you want to power a 4-ohm subwoofer rated at 200 watts RMS without straining your budget by investing in an expensive mono subwoofer amplifier.
Instead, use a compact 2-channel amp that delivers two channels of 60 watts RMS, and bridge it to produce an output of 190 watts RMS, which is ideal for driving the subwoofer.
Please note: When bridged, most amplifiers cannot drive a speaker or subwoofer with an impedance below 4 ohms. Additionally, some amplifiers are not designed to be bridged. Each amplifier has its specifications and requirements.
To bridge your amplifier safely and effectively, it is crucial to follow the instructions in its owner’s manual carefully.
Step 1
Use an amplifier that can deliver the desired power through the appropriate impedance load (4 ohms or higher) and features speaker-level inputs, making it compatible with the factory system.
Successful bridging depends on having a signal in the amplifier’s right and left channels.
Step 2
Tap into the back left and right factory speaker wiring, and take speaker wires to a speaker-level input plug that accompanies the amplifier.
Connect the negative terminal of the amplifier’s right channel to the negative terminal of the subwoofer for the output.
And then, connect the positive terminal of the amplifier’s left channel to the positive terminal of the subwoofer.
Frequently Asked Questions
How Can I Determine if My 4-Channel Amp Can Be Bridged?
Refer to the amplifier’s documentation or specifications to determine if your 4-channel Amp is bridgeable.
This information is available in the user manual, brochures, or the manufacturer’s website.
It is essential to rely on accurate and reliable sources to confirm the bridging ability of your specific amplifier model.
Is It Possible to Bridge All Four Channels of a 4-Channel Amp?
No, bridging all four channels simultaneously in a 4-channel amp is generally impossible. Bridging combines two channels to create a single channel with increased power output.
Thus, in a 4-channel amp, you can bridge two channels while the remaining two operate independently.
Do I Need Special Wiring or Additional Equipment for Bridging a 4-Channel Amp?
Bridging a 4-channel amp usually does not require special wiring or additional equipment beyond what is typically used for speaker connections.
However, ensuring that the wiring and connectors can handle the increased power output and impedance load resulting from the bridging process is essential.
Can a Bridged 4-Channel Amp Power Multiple Subwoofers?
Bridging a 4-channel amp is primarily intended for powering a single subwoofer effectively.
If you want to connect multiple subwoofers, use a dedicated mono or multi-channel amplifier specifically designed for that purpose.
These specialized amplifiers provide the necessary power and impedance matching for multiple subwoofers.
How Does Bridging Impact the Impedance of Speakers or Subwoofers?
Bridging a 4-channel amp generally halves the total impedance load the amplifier perceives.
For example, if each channel has a 4-ohm impedance, bridging would result in a 2-ohm load.
It is crucial to ensure that the amplifier can handle this reduced impedance to prevent overheating or damage.
Are There Potential Risks Associated With Bridging a 4-Channel Amp?
While bridging can increase power output, being aware of potential risks is essential.
Operating the Amp at lower impedance levels than it can handle may result in overheating, distortion, or permanent damage. Following the manufacturer’s guidelines and specifications ensures safe and optimal operation.
Related: